A guide to optimising images for SEO
15/07/2020
Ensuring your images are SEO-friendly and optimised for the web will help your website load faster, and generally encourage search engines to look upon your website more favourably. This month we take a look at some of the key aspects to take into account when creating and exporting images for your website.
1. Format
The first thing to be aware of when it comes to exporting an image, is whether you're using an appropriate image format for your needs. This will depend on both the type of image you are working with (e.g. a photograph of the real world vs a simple logo that has been created digitally), as well as the way you intend to use it (e.g. a large banner vs a small icon). There exists a sometimes daunting range of image formats to choose from, and the different format types will impact both the overall file size of your image, as well as the image properties you are able to use (e.g. transparency, animation, scalability etc.). If you were to pay no attention to file format or file size - for example, uploading an image straight from your phone/camera to a website - you will likely end up increasing both the time it takes to load pages, as well as the amount of data you're asking your users to download. Both these factors are something search engines pay close attention to and can end up having a detrimental effect on your SEO ranking.
Over recent years, PNG and JPEG have been the two most common image formats for web optimised images due to the fact they are comprehensively supported in modern web browsers and can be compressed to reduce their file size; however, the number of format options is growing in an effort to continuously improve our browsing experience, and a number of these 'next-gen' formats are becoming very popular.
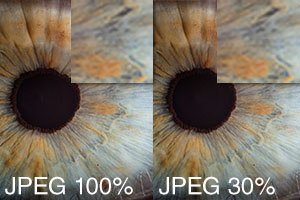
 Let's start by looking at the formats you may be more familiar with: JPEGs and PNGs. The JPEG image format (created in 1992) has been commonly used for many years for images that contain a wide range of colours and require no transparency. The format has been used extensively on the web because it can be heavily compressed to reduce the overall file size; for example, you can specify a quality setting between 1-100% when you export a JPEG to find a balance between sharpness and file size. One important characteristic of a JPEG is that it is a lossy format, which means that when it is compressed, it will permanently discard data from the image, resulting in a smaller file size. This is good from an optimisation perspective, but it's worth remembering that you should always keep a backup version of the original. In contrast, the PNG format, which was developed to replace the older GIF format, offered a number of properties that JPEGs did not; the most important being that it could support transparency, which made it an incredibly versatile when it came to design. In fact, the PNG format rose to popularity in part because it handled transparency better than any other format at the time, largely due to the fact it supported varying opacity, which in short means that the edges of graphics on transparent backgrounds looked sharp. Despite these benefits, the PNG format has limitations for use on the web since it is a lossless format and therefore even when compressed, PNG images will retain the same quality, often resulting in larger file sizes.
More recently, a number of 'next-gen' formats have been increasing in popularity and are likely to become the new standard for web images. With search engines placing evermore importance on site performance, adopting 'next-gen' formats could be a way to keep your website SEO-friendly and stay ahead of the competition. In this article, we're going to specifically cover: Scalable Vector Graphics (SVGs), the WebP format (developed by Google), and the JPEG 2000 format.
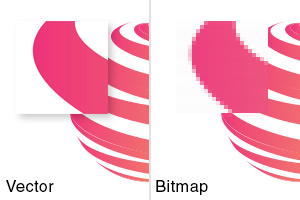 The SVG format in particular has surged in use thanks to improved browser support, offering phenomenal performance and flexibility when using vector images. A vector image is an image made up of shapes and points, rather than a grid of pixels like a bitmap image (e.g. a photograph). SVG images tend to have very small file sizes and can also be scaled indefinitely without any loss of quality. It is for this reason that many modern logos are designed in vector format, being made up of simple shapes and colours, so that a single vector image can be scaled from a smartphone to a giant stadium display, without any impact on file size or loss in quality. SVG is well-supported and is currently the best format to use for vector images on the web, such as vector logos, icons and illustrations. It can even offer the capability to animate the shapes inside the image.
Another format rapidly increasing in popularity is Google's WebP format, which launched in 2010 and was developed with a mind to supersede PNGs, JPEGs and GIFs. The WebP format has been shown to outperform more common formats in producing smaller files with comparative quality (25-34% smaller). It also offers many of the same benefits, such as support for transparency, support for animation, as well as lossy and lossless compression. Whilst browser support for the WebP format is still catching up, it likely won't be long before this is widely considered to be the new standard for bitmap images on the web.
Finally, it's worth mentioning the JPEG 2000 format, which was designed to supersede the standard JPEG. The JPEG 2000 solved a wide number of problems that the previous version failed to address and was revised to work in a very different way. The most relevant aspect for our discussion around web optimisation is JPEG 2000's state-of-the-art method of compression that enables a single file to offer a high level of scalability, at a comparatively small cost to file size. Instead of having to save multiple versions of an image for different sizes, JPEG 2000 analyses what is different when the same image is displayed at different sizes. Because this difference is actually relatively small, it means that JPEG 2000 can offer outstanding compression compared to its counterparts and has become a standard in a number of applications, such as film, medical imaging and digital photography. So what's the drawback? Currently, the JPEG 2000 format is only supported on Apple's Safari browser, meaning that if used, it would only benefit users on Apple devices. However, this is definitely a format worth using in the right scenario and something to keep an eye on as support grows.
2. Image Size & Compression
 Once you know which file size is the most appropriate for your image type and application, it's important to also export your image at the right size (or resolution) and quality. Images do not need to be exported any larger than they will be displayed on a website, otherwise you are adding additional data to the file that the user will never benefit from. As an example, a photo taken on an iPhone will be upwards of 3000px wide, however, the most common screen size in the world is currently 1366x768px, with 1920x1080px closely behind it. That means that even if the image you wanted to create would be used on your website to fill the screen, it still wouldn't require that level of detail. In short, try to create images at the maximum size they will be displayed.
Secondly, it's important to pay close attention to the compression settings (sometimes referred to as 'quality') when you export your image. Similar to the issue with size, there's no need to export an image at a higher quality than it needs to be, since it will only increase the file size. If you don't have access to image editing software, such as Photoshop, there are many online image compression services, such as Compress-Or-Die, that will bring the file size of your image down by removing data that often you can't even see.
3. Image Content
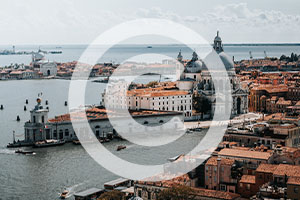
 While there’s no harm in using stock images, try looking for more unique images that represent your business, or invest in getting some professional photographs taken. Unique, relevant images will increase the chances of them appearing in the image search results, and could become a source of additional traffic to the website. High quality or animated images can also increase the chances of users staying on your website for longer, which is also something search engines analyse. Conversely, very generic images will not stand out in image search results and could reduce engagement with your content.
If you plan to use more graphically designed images, such as banners, graphs or infographic, ensuring these are of high quality, provide additional value to the main content of the page and are easy to read on mobile devices too. If the graphics look outdated or aren't clear, this could push visitors away from your content and site. You may also need to create a version for mobile view and desktop view for best viewing results, depending on the graphic's content.
4. Copyright
 Don’t just grab images straight from an image search – search engines don't look favourably on this and you will run the risk of receiving a copyright notice. It’s always worth either purchasing stock images from trusted sources such as iStock or Shutterstock, or sourcing royalty-free pictures from websites like Pixabay. Make sure to double-check the licence before you download the image, as some that appear to be royalty-free may still require attribution or a link back to the original owner’s page.
5. File Names
 Be sure to give your images a descriptive filename that ties in with the keywords you want to be found for. Using a filename like “DCM-124792.jpg” for an image doesn't help search engines understand what the image relates to, and subsequently what your page might be about. It also reduces the chances of the image ever being found in an image search. If for example, you were selling pet accessories, an example of a descriptive filename might be “ginger cat sleeping on a luxurious cat bed.jpg”, which describes exactly what the image is about to search engines and helps to reinforce the keyword strategy. Sometimes, thinking about what you would search for to find a particular image can help in deciding how best to name it. Don't use this as an opportunity to stuff keywords into the image name though, search engines can tell that it looks spammy and may demote the ranking.
6. Alt Text
 Similarly to the file names, adding alt tags to your images will help with SEO and accessibility. The alt tag will be displayed if an image can’t load for any number of reasons, so providing a useful and descriptive tag will tell the user what should have been displayed in that space. Alt tags are also read out by screen readers so visually impaired users can still tell what content is being displayed. These tags can either be added in the code inside the image tag by adding an alt tag inside this, e.g.
 <img src="sunflower.jpg" alt="A sunflower against a blue sky"> .Alternatively, if you use a content management system, there is usually an option to add the alt tag to each individual image in here.
7. File Path
 This last step may not seem as obvious as the others, but organising your media folders in the back end of your website can also help direct search engines to your images and page if you can. For example, having a folder called “/shoes/” is quite vague if this folder contains images of many types of shoes. By simply changing the file structure to “/shoes/trainers/” or “/shoes/high-heels/” and organising your images this way, adds another level of detail that can help search engines find your content and lead users to your website.